Introduction: Why Silent Keyboard Switches?
The feedback and sounds from mechanical keyboards are part of what makes them loved by some. Their popularity, however, comes with problems as well. The sound of mechanical keyboards can be very distracting for others around the user in an office, at a dorm room, during gaming sessions, and even in the studio. This makes silent keyboard switches the perfect mechanical solution.
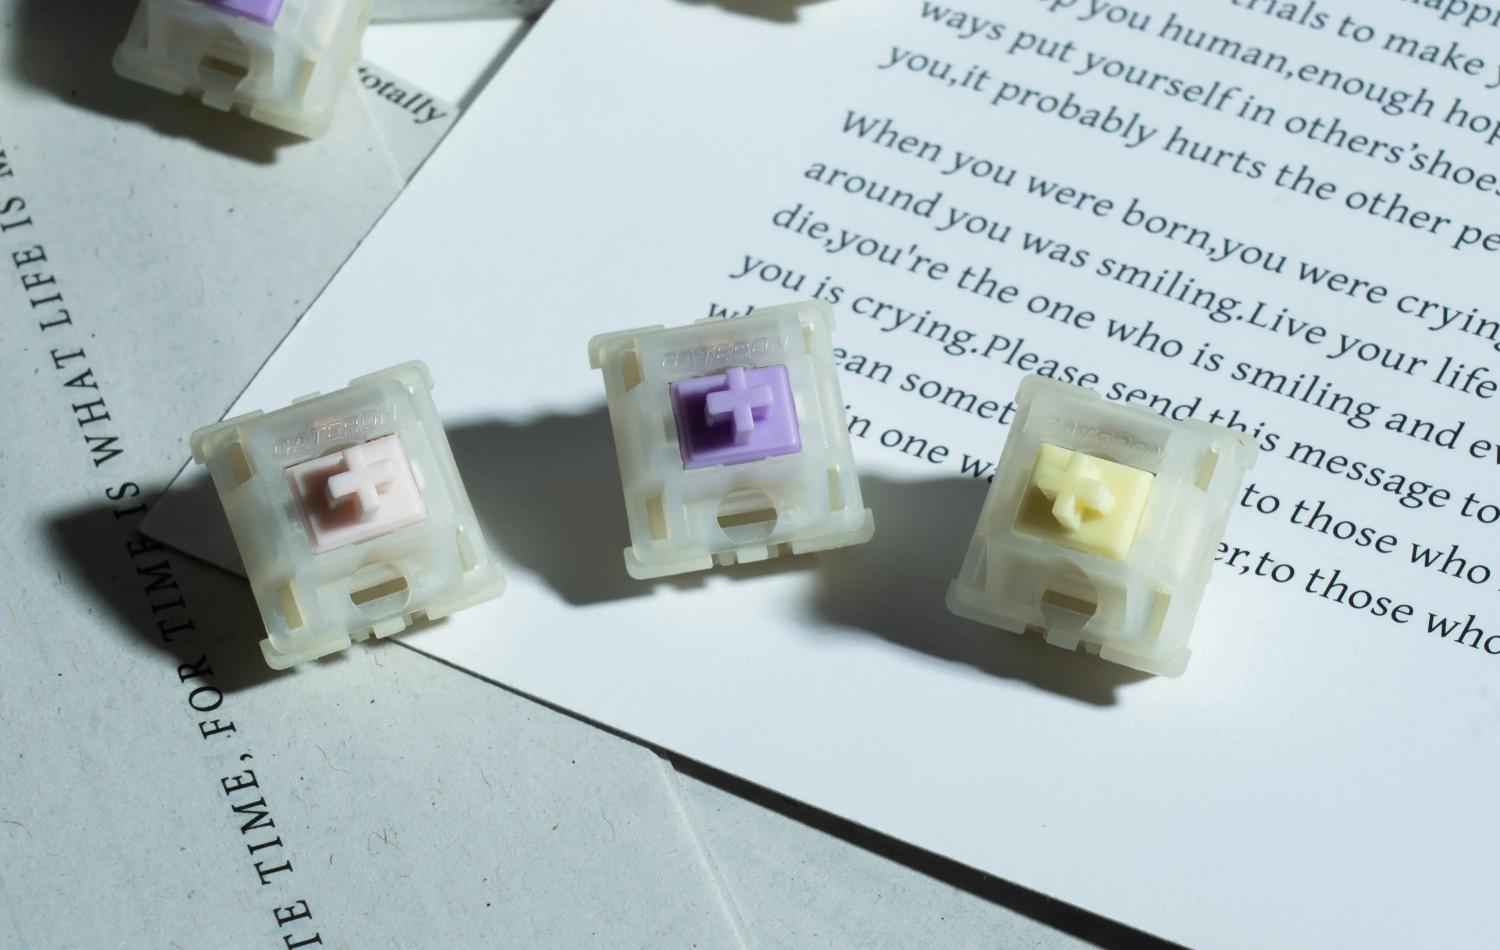
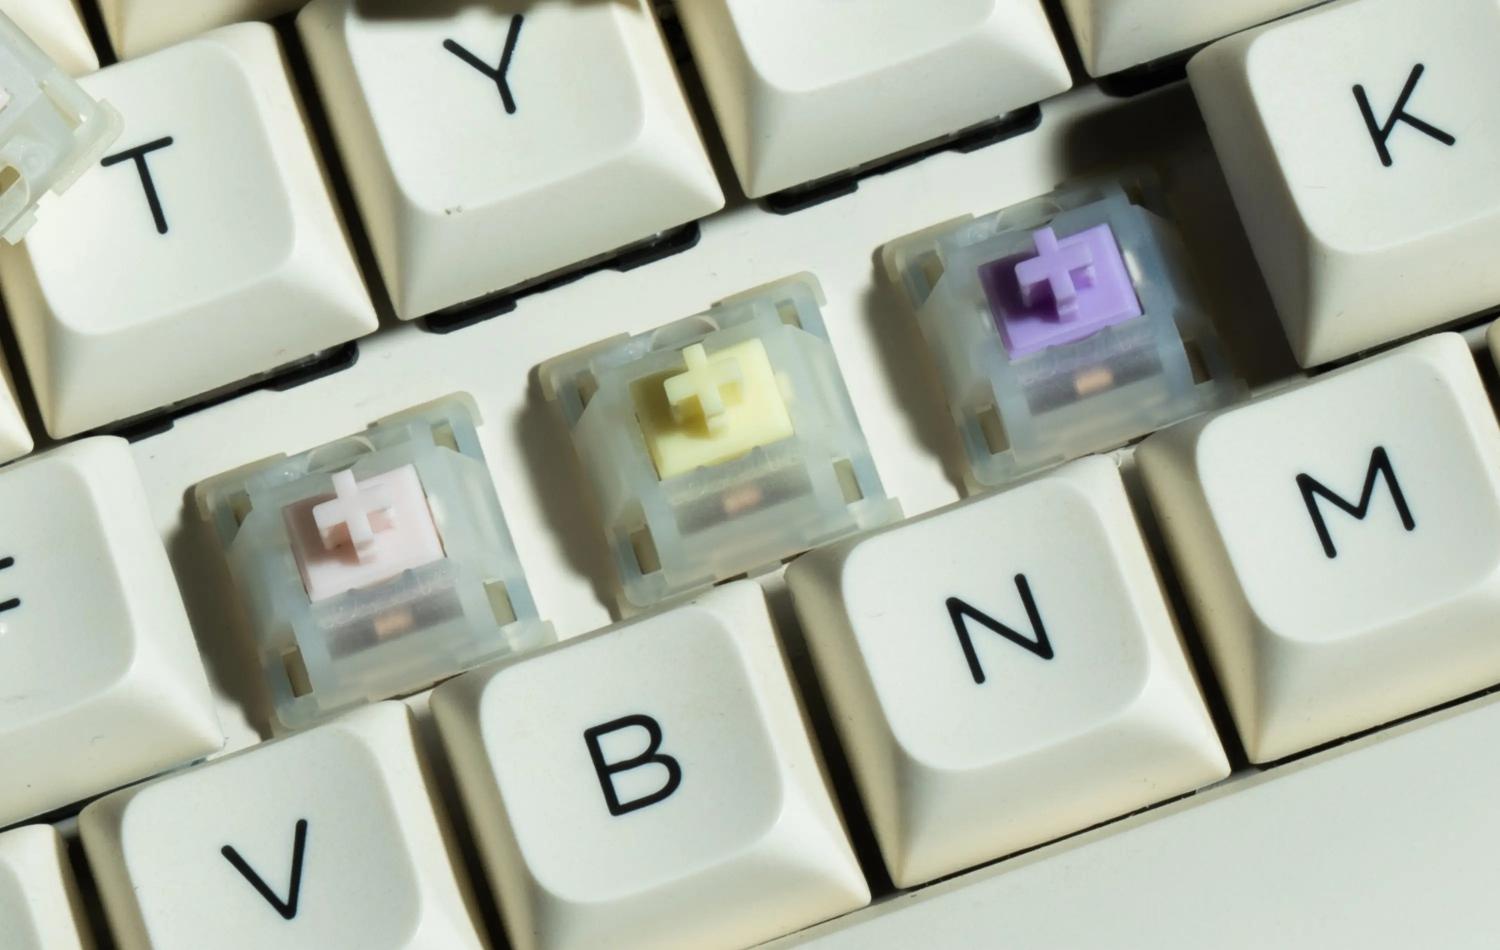
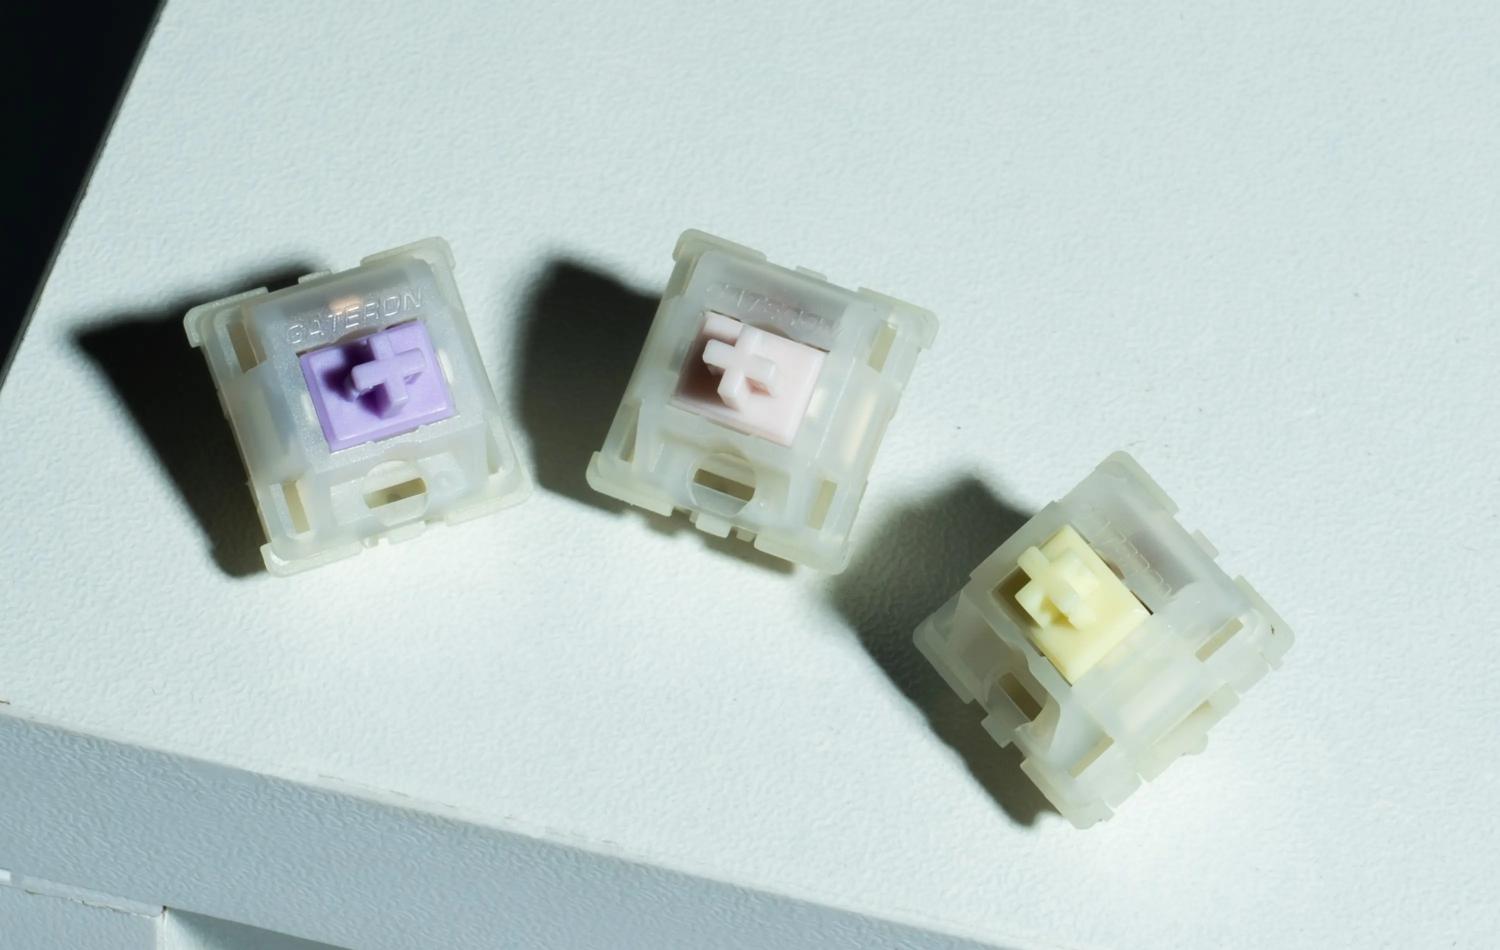
An example of a silent keyboard switch is the GATERON KS-3X1 Milky Pro series. Unlike a switch that is designed to be clicky and therefore makes switches intentionally audible, silent switches focus on sounds made by the impacts of parts of a switch inside a housing. Modern silent switches are far beyond older switches that were often seen as "mushy." They can now maintain that sound level while being far improved.
This guide helps you learn about and understand silent keyboard switches. With the ability to understand silent switches from the basics and the knowledge to install and adapt them, you will demonstrate your skills like a professional.
Part 1: How to Choose Silent Keyboard Switches
1.Understanding Switch Types: Linear vs. Tactile vs. Heavy Tactile
Your biggest decision regarding which switches you choose is deciding the type of feedback you want. The feel of a switch can generally be described in one of 3 categories.
- Linear Silent: The motion is entirely smooth and has no bump. If you are looking for a smooth style of typing, seamless and speedy keystrokes, this is a good option.
- Tactile Silent: A bump is felt at the actuation point which lets your fingers know that the key has been pressed. Bump is also felt if the key is not fully pressed to the bottom. Excellent option for silent typing.
- Heavy Tactile: These switches require an even greater amount of force to press, but provide a greater bump to confirm the key has been pressed. These switches are a good balance of loudness and feedback.
The variants in the KS-3X1 series consist of the Milky Pink Pro, Milky Purple Pro, and Milky Yellow Pro switches. These have the following specifications:
- Milky Pink Pro: 45±15gf, 2.0±0.6mm, 3.8mm
- Milky Purple Pro: 55±15gf, 1.5±0.5mm, 3.8mm
- Milky Yellow Pro: 60±15gf, 2.0±0.6mm, 3.4mm
2.Reading the Spec Sheet: What the Numbers Mean
Identifying the numbers associated with keyboard switches is especially important for identifying silent switches. Some of those numbers are defined below:
- Operating Force (gf): Refers to the weight that a key requires for the switch to be activated. The less the weight, the less fatigued a typist's fingers will be, but more weight translates to less key slip.
- Pre-Travel: Refers to the distance the key must travel before the switch is activated. The farther the distance, the longer travel there is before the switch is pressed.
- Total Travel: Refers to the total travel a key can be pressed. A switch that has a total travel of less than 4.0mm will likely have an excellent and very responsive key.
- Spring Type: GATERON uses dual-stage springs in the KS-3X1 series, which give a snappier response than older models with a slower switch.
3.Why Factory Pre-Lubrication Matters
One of the most significant advances in silent keyboard switches is factory pre-lubrication. GATERON's mature "family-style" factory pre-lube technology reduces friction points inside the switch, delivering a smoother press out of the box with fewer scratchy sensations and more consistent feel across all keys. For beginners, this means you don't need to disassemble and lubricate switches manually—they're ready to use immediately.
4.How Silent Switches Achieve Silence
Understanding the technology helps you appreciate what you're buying. Most mechanical switch noise comes from two contact points:
- Bottom-out sound: The impact when the stem hits the bottom housing
- Top-out sound: The impact when the stem returns and taps the top housing
Silent keyboard switches address both through:
- Dual-rail construction: Guides that hold the stem steady and eliminate sideways rattling
- Factory lubrication: Diminishes noise caused by friction and vibration
The KS-3X1 series takes this further with upgraded silent rings—damping spring rings embedded on both sides of the stem—effectively silencing both the downstroke and the upstroke.
Part 2: Installing Keyboard Switches
Installing keyboard switches requires taking a look at your keyboard first.
- Hot-swappable vs Soldered: Swappable keyboards let you easily remove switches and insert new ones. If they are soldered, you will need to buy a desoldering tool or a new keyboard.
- Second, Pin Configuration: KS-3X1 switches will have a 5-pin configuration. Many hot-swappable keyboards come with a 5-pin configuration, but a good deal of them will come with a 3-pin configuration. Verify your keyboard before purchasing switches.
- Third, Compatible with MX: Because GATERON switches will have a generic MX stem, they will most likely work for the majority of keycaps/keyboards.
Installation Guide
Step 1: Make Room
- Do this on a soft surface to avoid damaging the keyboard.
- Keep your keyboard, a keycap/switch puller, and a soft surface.
Step 2: Remove Keycaps
- Use the keycap puller to pull keycaps straight off.
- To help in the reassembly of the keyboard, keep keycaps in order they were removed.
Step 3: Remove the Old Switches
- Use the switch puller to pull tabs on the top and bottom of the switch.
- Pull the switch straight up, wiggling or twisting will bend the pins.
Step 4: Add Switches
- Check the switch pins and make sure they are straight.
- Switches are difficult to install in the wrong direction, but can easily be misaligned.
- If a switch isn't going all the way in, it has most likely lost its alignment, and needs to be realigned and pressed in again.
- When pressing the switch in, support the PCB by placing your thumb under the socket of the PCB and thumb under the switch.
Providing support when handling the PCB is advised to avoid damaging the PCB.
Step 5: Test Before Reassembly
- Without the keycaps, the keyboard can be tested to see if the keys work.
- If a key does not register, check pins for bending and insert switch again.
Common Mistakes to Avoid:
- Bent pins are the most common error when installing switches and should always be checked before install.
- Forcing the switch can also cause failure and should be checked for alignment.
- Installing the switch upside down is also an error and should be checked by verifying the alignment slot.
Part 3: How to Tune and Maintain Silent Keyboard Switches.
1.Understanding Lubrication: When and Why
Lubrication is an important long-term maintenance consideration even with factory pre-lubed switches such as the KS-3X1 series.
Factory pre-lube reduces friction, so it provides keys with smoother travel and more refined keystrokes that are softer.
- How often to lubricate: Daily users who spend hours typing may want to re-lubricate every three to six months; 12 months at the longest.
- What to use: Use specialized keyboard lubricants. Never use petroleum jelly or Vaseline—they will damage the plastic and degrade your switches over time.
2.Basic Lubrication Technique
For those who want to go beyond factory lubrication:
- Remove the switch from the keyboard using a switch puller
- Open the switch using a switch opener tool
- Apply lubricant sparingly to the stem rails (the sides where the stem slides)
- Lube the spring to eliminate "spring ping"
- Important for tactile switches: Do not lubricate the tactile legs—this will dramatically reduce or eliminate the tactile bump
3.Switch Modding: Advanced Tuning
For enthusiasts, switch modification opens up a world of customization:
- Film modding: Adding thin films between the top and bottom housing reduces housing wobble and tightens the sound profile.
- Spring swapping: Changing the stock spring for another type of spring (progressive, long, etc.) or a spring with a different weight changes feel and rebound.
- Stem swapping: Stems from different switches can be combined, making hybrid switches. An example is a silent stem in a new housing that changes the sound of the switch.
4.Keyboard Maintenance
Looking at the switches is not enough:
- Cleaning: Dust and debris build up under the switches if the keyboard is not cleaned. Use compressed air or a soft bristle brush.
- Changing keycaps: Keycaps can be worn down and typed on unevenly.
- Check switch performance: If a key feels scratchy or won't switch reliably, the switch may need to be cleaned or lubed.
The Silent Keyboard Switches Journey: A Conclusion
You can start your keyboard journey as a beginner or enthusiast. Learning what silent keyboard switches are, how to install silent keyboard switches, and how to tune your switches can all be done in a short amount of time.
One of the best examples of improvements in silent switches is the GATERON KS-3X1 Milky Pro series. These switches have a dual-stage spring for better rebound, upgraded silent rings for full noise dampening, a milky nylon housing to diffuse RGB better, and a factory pre-lube job. These switches are built for comfort and precision, and with a rating of 60 million keystrokes, user reliability.
For the essay writing dorm dweller to the all night gamer, even the late night UX designer and the audio recording creator, there is a perfect silent switch keyboard switch for everyone. Understanding your switch preferences will provide keyboard confidence for your style without making noise.
FAQs
Q1: Will silent switches affect RGB lighting?
A: Silent switches will improve your RGB lighting. An example is the KS-3X1 which has a milky housing which diffuses light evenly for a seamless lighting effect.
Q2: Do silent switches feel mushy?
A: Not at all, with the KS-3X1 and others you will experience a responsive and even springy feel with no mushiness.
Q3: Which type should I choose – linear, tactile, or heavy tactile?
A: For gaming smooth linear is the way to go, for typers, tactile, and for a stronger bump a heavy tactile is your best bet.
Q4: Can I install silent switches on any mechanical keyboard?
A: Only if it's hot swap with a 5pin silent switch. Soldered keyboards are out of the question unless you know how to desolder.
Q5: Do I need to lubricate factory‑pre‑lubed switches?
A: Not usually, but if you want to after 5 months of use and to maintain a buttery smooth switch feel, go for it.


